原生iOS和Android的開發者在初次使用React Native時,很容易感到迷惘、不適應(反之亦然),這是因為兩邊的設計理念不同,導致在開發過程中需要的思維也不相同。
React的設計貫徹Declarative Programming(聲明式編程)的思想,與其相反的是Imperative Programming (命令式編程)。這篇介紹一下兩者有甚麼分別,讓大家理解一下兩種理念在實際使用上的分別。
React的設計理念
React.js的設計理念主要有三:
- Declarative
- Component-Based
- Learn Once, Write Anywhere
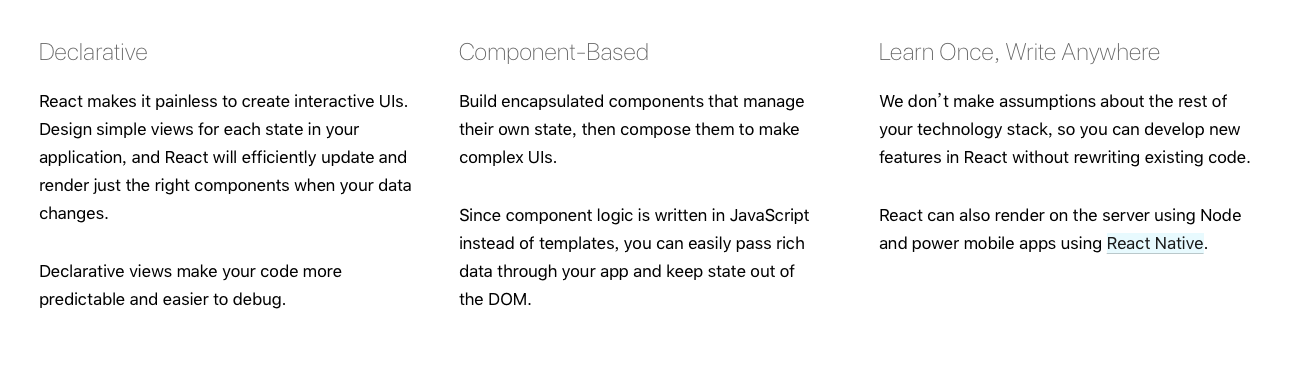
後兩者應該頗易理解的,這篇就主要講解Declarative的概念吧。
Imperative vs Declarative
定義
以下是取自Wiki的定義:
Imperative
Imperative programming is a programming paradigm that uses statements that change a program's state. (Reference)
Declarative
Declarative programming is a programming paradigm that expresses the logic of a computation without describing its control flow. (Reference)
How(如何) vs What(甚麼)
Imperative是告訴程式如何做(How)一些事,其實就是平日programming常做的,你寫下指示,程式一步一步跟隨你的指示做。
Declarative是聲明你需要甚麼(What),不用理會程式用甚麼方法、甚麼步驟做到。
React Component中的render()方法,就是聲明不同狀態(state)下,應該顯示甚麼Component(而不是親自建立一些Component然後放到view裡面)。
實際例子
SQL
Imperative
$name = []
$city = []
customers.each do |customer|
    $name.push(customer.name)
    $city.push(customer.city)
end
Declarative
SELECT Name, City FROM Customers;
jQuery vs React
Imperative
$("#btn").click(function() {
  $(this).toggleClass("highlight")
  $(this).text() === 'Add Highlight'
    ? $(this).text('Remove Highlight')
    : $(this).text('Add Highlight')
})
Declarative
<Btn
  onToggleHighlight={this.handleToggleHighlight}
  highlight={this.state.highlight}>
    {this.state.buttonText}
</Btn>
iOS/Android vs React Native
以動態建立Button作為例子:
Imperative
iOS
class ViewController: UIViewController {
    @IBOutlet weak var button: !
    override func viewDidLoad() {
        super.viewDidLoad()

        let buttons = ["Button 1", "Button 2"]
        for buttonName in buttons {
            let button = UIButton(frame: CGRect(x: 100, y: 100, width: 100, height: 50))
            button.setTitle(buttonName, for: .normal)
            button.addTarget(self, action: #selector(buttonAction), for: .touchUpInside)
            self.view.addSubview(button)
        }

    }
}
Android
public class MyActivity extends Activity {
    protected void onCreate(Bundle savedInstanceState) {
        super.onCreate(savedInstanceState);

        LinearLayout linearLayout = new LinearLayout(this);

        String[] buttons = {"Button 1", "Button 2"};
        for ( int i = 0; i < buttons.length; i++) {
            Button button = new Button(this);
            button.setText(buttons[i]);
            button.setOnClickListener(new View.OnClickListener() {
                public void onClick(View v) {
                    // ...
                }
            });
            linearLayout.addView(button);
        }

        setContentView(...);
    }
}
Declarative
class SomeView extends Component {
  render() {
    const buttons = ["Button 1", "Button 2"]
    return (
      buttons.map(name =>
        <Button title={name} onPress={this.onPressButton} />
        );
    )
  }
}
效能的考慮
雖然聲明式好像很方便,但背後卻依賴程式知道你的甚麼是如何做出來。不止是component在screen上面顯示出來(這當然要做到啊),最麻煩的是當state變動時,如何有效率地重新刷新一次頁面。
這方面React用到Virtual DOM和自家的diff演算法,把原本O(n3)的複雜度減至O(n),詳細可看這篇文章,這裡就不詳述了。